You love the tailored appearance of your inside mount shutters, but lately, you’ve noticed some issues. Maybe one panel hangs slightly lower than the other, or you’re fighting with louvers that won’t stay put. These are classic inside mount shutters problems, and they are more common than you might think, especially in homes across Southern California where temperature shifts can affect how things fit. Don’t worry, you don’t need to call in a professional for every little tweak. Many of these annoyances can be solved in just a few minutes with a screwdriver and a little know-how. We’ll show you how to address everything from light leaks to sticking panels with easy, step-by-step instructions.
Key Takeaways
- Address common shutter issues yourself: You can fix many minor problems in minutes; tighten a tension screw to stop louvers from drooping, adjust hinge screws to realign a crooked panel, or apply a silicone lubricant to fix sticking.
- A professional fit prevents future problems: Most shutter issues, including light gaps and poor alignment, are caused by imprecise measurements or uneven window frames, which is why an expert installation is essential for smooth, long-term function.
- Achieve total darkness with simple additions: For maximum light control, apply adhesive weatherstripping to seal small gaps around the frame or layer your shutters with blackout curtains for a complete room-darkening solution.
Troubleshooting Your Inside Mount Shutters
Inside mount shutters give your windows a beautiful, built-in look. But like anything in your home, they can sometimes need a little adjustment to keep them working perfectly. Don’t worry, most common issues are simple to fix yourself. Here’s a guide to troubleshooting some of the typical problems you might encounter, so you can keep your shutters looking and functioning their best.
Crooked or misaligned panels
If you notice one shutter panel hanging slightly lower than the other, creating an uneven gap, it can disrupt the clean lines of your window. This misalignment can also let in unwanted light and reduce insulation. The fix is usually found in the hinges. Simply open the panel and use a screwdriver to slightly loosen the screws holding the hinge to the shutter frame. This will allow you to gently lift or lower the panel until it’s perfectly aligned with its partner. Once it’s in the right spot, tighten the screws back up. This small tweak makes a big difference for your shutters.
Light leaking around the edges
Seeing small slivers of light around the edges of your shutters is a common issue, especially in homes where window frames aren’t perfectly square. While plantation shutters offer excellent light control, they aren’t designed for a complete blackout effect. The key to minimizing these light gaps is ensuring the snuggest fit possible from the very beginning. This is why professional, precise measurements are so crucial for an inside mount. For existing shutters, you can often reduce light leaks by applying thin, self-adhesive light-blocking strips or weatherstripping to the inside of the shutter frame for a tighter seal against the window frame.
Shutters that stick or won’t open smoothly
There’s nothing more frustrating than a shutter panel that sticks or louvers that are difficult to adjust. Over time, dust and grime can build up in the hinges and moving parts, causing this friction. The solution is a simple two-step process: clean and lubricate. First, use a vacuum with a soft brush attachment to gently clean out the hinge mechanisms. Then, apply a small amount of a silicone-based lubricant directly to the hinges. Open and close the panel a few times to work the lubricant in. Your shutters should be gliding smoothly again in no time.
Panels hitting the window or trim
If your shutter panels or louvers bump into your window crank or lock when you try to open them, it’s usually because the window recess isn’t deep enough for the shutter style. Inside mount shutters require a certain amount of clearance to operate without obstruction. This is a measurement-critical issue, which is why our expert mobile services are so valuable for homeowners in San Diego, Orange, and Riverside counties. For an existing installation, you might be able to solve the problem by swapping out your window hardware for a model with a lower, flatter profile to create the extra space needed.
Loose, warped, or drooping louvers
Do your louvers refuse to stay put, slowly drooping downward after you’ve adjusted them? This is a completely normal issue caused by the tension screw loosening over time, often due to temperature fluctuations. It’s also one of the easiest problems to fix. On the side of each shutter panel, you’ll find one or two small holes containing a tension screw. Using a Phillips head screwdriver, simply give the screw a slight turn clockwise. Test the louvers, and if they still feel loose, give it another quarter-turn. You want them tight enough to hold their position but still easy enough to adjust by hand.
Why Are My Shutters Misaligned or Sticking?
It’s frustrating when your beautiful shutters don’t work as they should. Whether they’re sticking, hanging crooked, or letting in unwanted light, the problem usually comes down to a few common culprits. Most issues with inside mount shutters trace back to the fit and the environment. An imperfect window frame, a tiny measurement error, or even the humidity in your home can affect how your shutters operate.
The good news is that these problems are often preventable with the right approach. Understanding why your shutters are misaligned is the first step toward finding a solution. From the initial measurements to the final installation, precision is key. Even something as simple as a window crank can get in the way if it’s not accounted for. Let’s look at the four main reasons your shutters might be giving you trouble and what you can do about it.
Uneven window frames
If you’ve ever tried to hang a picture frame, you know that not all walls are perfectly straight, and the same goes for window frames. Many homes, especially older ones in Riverside County, have window openings that aren’t perfectly square. When you install a perfectly square shutter frame into an uneven opening, you can get gaps where light leaks through. This misalignment can also cause the shutter panels to bind or not close properly, making your window’s imperfections more noticeable. A custom fit is essential to make sure your shutters are measured and built to the exact specifications of your unique window, ensuring a seamless look and smooth operation.
Incorrect measurements or installation
Shutters are not very forgiving when it comes to measurement mistakes. Even being off by a fraction of an inch can lead to significant problems with alignment and function. If the initial measurements are inaccurate, the shutter frame might be too tight or too loose, causing it to stick or hang crookedly. Professional installation is so important because it ensures every measurement is precise before a single shutter is ordered. Our team handles everything from start to finish, providing expert mobile services to homeowners across Orange County and San Diego County to guarantee a perfect fit every time and avoid these common installation headaches.
Obstructions from window hardware
Sometimes, the problem isn’t the shutter itself but what’s around it. Window cranks, locks, and even the trim can interfere with the shutter’s movement. If the window casing is too shallow, the shutter louvers might hit the window handles or tilt-in mechanisms when you try to open or close them. This can prevent the panels from closing fully or cause them to stick. During a professional consultation, an expert will check for these potential obstructions and recommend the right mounting depth and frame style to ensure your new plantation shutters operate smoothly without hitting any existing hardware.
Warping from moisture or humidity
Wood is a natural material that can be affected by its environment. In areas with high humidity, like kitchens or bathrooms, wooden shutters can absorb moisture from the air. Over time, this can cause the wood to swell, bend, or twist out of shape, a process known as warping. Warped shutters can be difficult to open and close, and the louvers may no longer sit flush. To avoid this, consider moisture-resistant materials for rooms with high humidity. Shutters made from materials like Polycore are designed to withstand damp conditions without warping, making them a durable and long-lasting choice for any room in your home.
What Obstructions Can Affect Your Shutters?
Inside mount shutters are loved for their clean, built-in appearance, fitting snugly within the window frame. But for this seamless look to work, the window itself needs to be a good match. Sometimes, existing features of your window can get in the way of a perfect fit and smooth operation. Things like shallow window casings, decorative trim, or even the handles you use to open the window can create frustrating problems if they aren’t accounted for before installation. When the shutter frame doesn’t sit perfectly, you can end up with misalignment, light gaps, or panels that stick, which defeats the purpose of getting beautiful, custom window treatments. Understanding these potential obstructions is the first step to ensuring your new shutters look and work exactly as you want them to. Let’s walk through the most common issues we see in homes across Orange, Riverside, and San Diego counties, so you can be prepared for a smooth installation process.
Not enough window depth
For an inside mount, the shutter frame needs a certain amount of space to sit inside the window casing without protruding into your room. Think of it as the window’s “ledge.” Typically, you need at least 1.5 to 2 inches of depth for the shutter frame and louvers to fit comfortably. If your window casing is too shallow, the shutter might not fit at all, or the louvers could hit the glass or window locks when you try to open them. This is why precise measurements are so important; a professional consultation can identify shallow windows and recommend the right shutter frame to solve the problem.
Conflicts with trim and hardware
Many windows are framed with beautiful, decorative molding or trim. While this adds character to a room, it can sometimes interfere with an inside mount shutter. If the trim is particularly ornate or uneven, the shutter frame may not sit flush against it, leaving unsightly gaps or creating a messy, misaligned look. Similarly, existing window hardware like alarm sensors or certain types of locks can block the shutter frame from being installed correctly. A custom fit ensures the shutter frame is designed to work with your existing trim and hardware, not against it. You can see examples of seamless fits in our gallery.
Issues with window cranks and handles
Do you have casement or awning windows that open with a crank? This is a major factor to consider. An inside mount shutter frame can sometimes be installed directly over the crank handle, making it impossible to open your window without swinging the entire shutter panel out of the way first. This can be a daily annoyance that undermines the convenience of your windows. During a professional fitting, an expert will assess the placement of your window cranks and recommend a frame style or mounting option that preserves full window functionality, so you don’t have to choose between fresh air and beautiful shutters.
Interference with tilt-in windows
Many modern windows are designed to tilt inward, which is a fantastic feature that makes cleaning the exterior glass a breeze. However, an inside mount shutter can completely block this function. The shutter frame sits in the path of the window sash, preventing it from tilting into the room. This means a simple cleaning job could turn into a major hassle. It’s a common oversight for DIY installations, but it’s something a professional installer will spot right away. We can help you select a frame or mounting style for your plantation shutters that allows your windows to tilt in as designed.
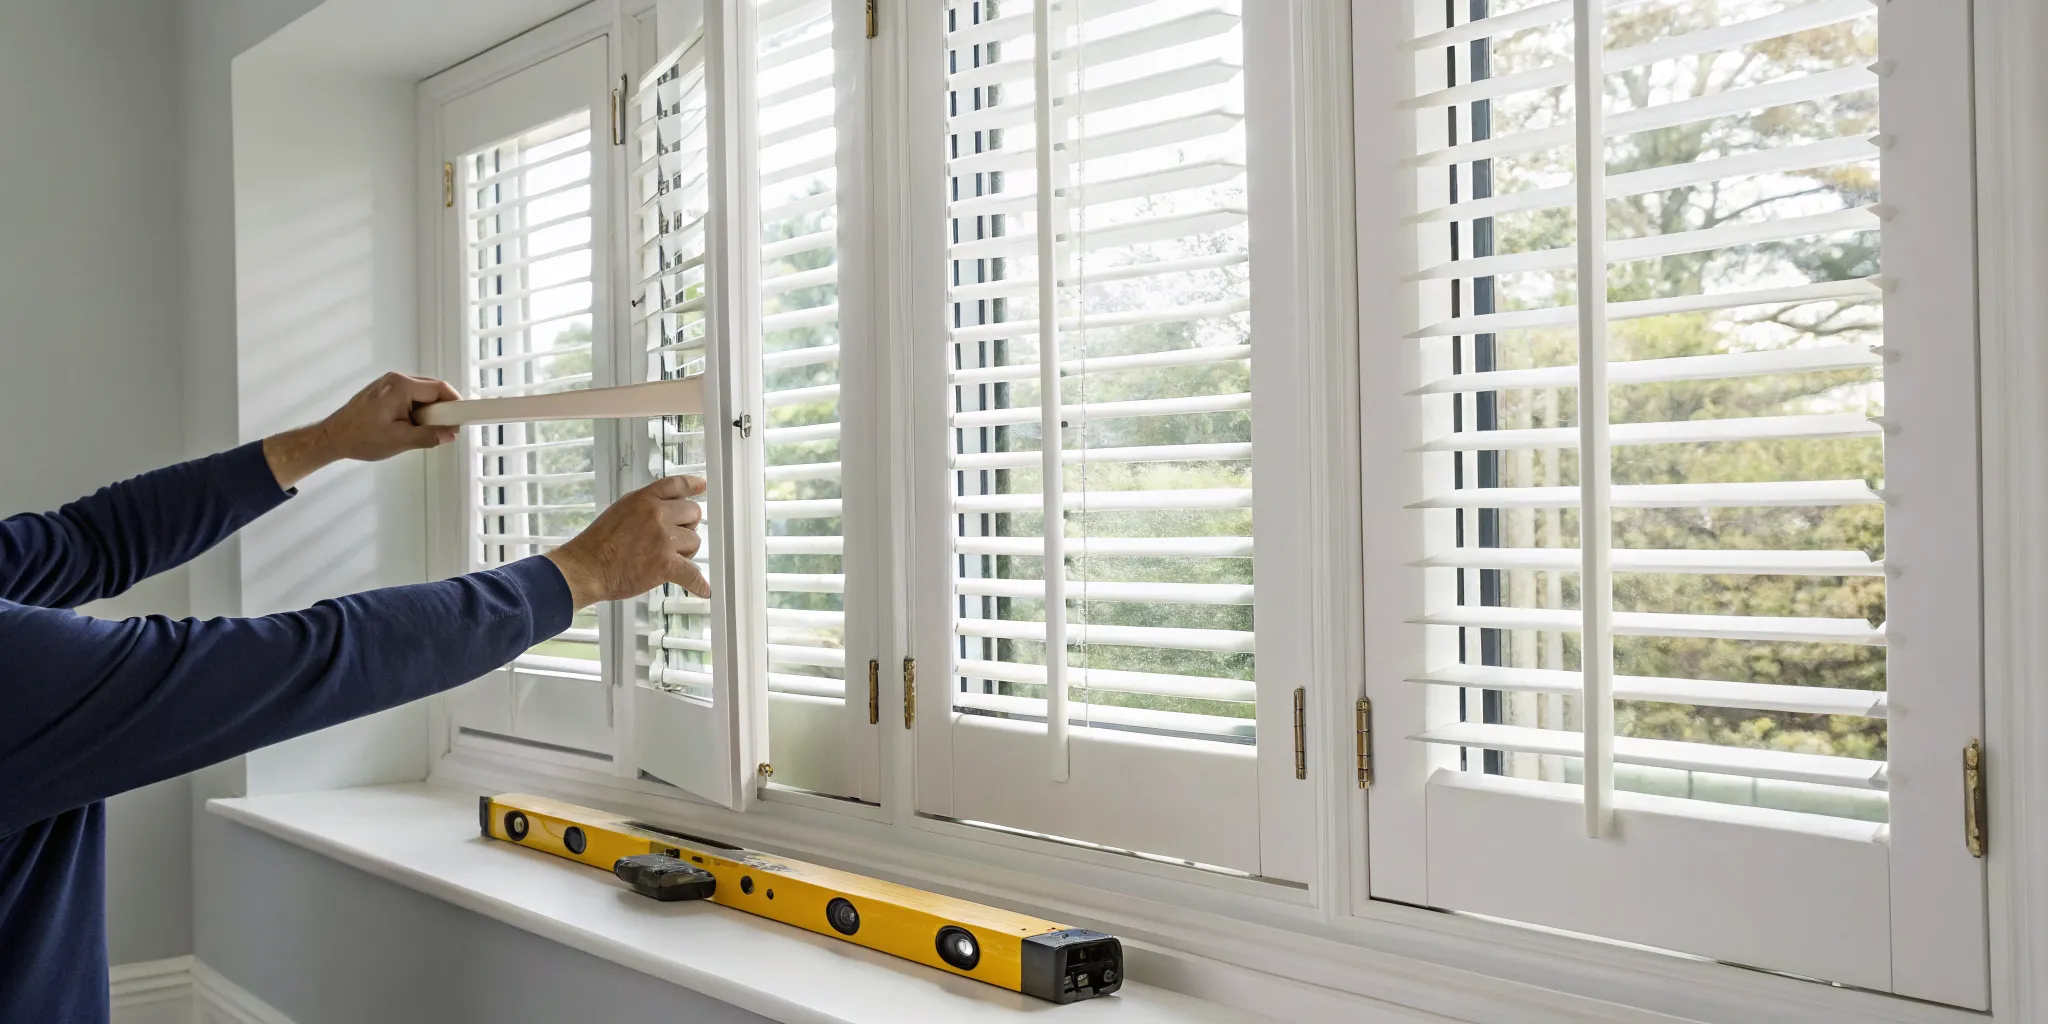
How to Fix Common Shutter Issues
Even the highest-quality shutters can run into minor issues over time. The good news is that many common problems have simple, do-it-yourself solutions that don’t require a service call. From a crooked panel to a louver that won’t stay put, a few minutes with basic tools can often get your shutters looking and working like new again. Here are a few quick fixes for the most frequent shutter troubles.
Realign crooked shutter panels
If you notice your shutter panels are hanging unevenly, creating awkward gaps, the fix is usually in the hinges. These gaps don’t just look off; they can let in unwanted light and reduce your home’s insulation. To fix this, open the panel and use a Phillips screwdriver to slightly loosen the hinge screws attached to the frame. Gently lift or lower the panel until it’s level, then retighten the screws. You may need a helper to hold the panel in place while you work. If adjusting the hinges doesn’t solve the problem, the window frame itself might be uneven, which may require a professional touch to get your shutters perfectly aligned.
Tighten loose louvers and hinges
Do your louvers droop or refuse to stay in your desired position? This is a classic sign that the tension needs adjusting, a very common and easy fix. Open your shutter panels and look along the side stiles for a small screw hole. Inside, you’ll find the tension screw. Simply insert a Phillips screwdriver and turn it clockwise a quarter-turn at a time. Test the louvers after each small adjustment. You want them to move smoothly when you tilt them but stay put once you let go. Be careful not to overtighten, as this can make the louvers difficult to move. This simple tweak can make your plantation shutters feel brand new.
Fix sticking with simple cleaning and lubrication
Shutters that stick or are difficult to open and close are often just victims of dust and debris buildup. Over time, dirt can accumulate in the hinges and other moving parts, causing friction. Start by giving your shutters a thorough cleaning with a soft cloth or vacuum brush attachment, paying close attention to the hinges. If they still stick, apply a small amount of a silicone-based lubricant to the hinge mechanism. Avoid using oil-based products like WD-40, as they can attract more dust and grime over time. A quick clean and lubrication is usually all it takes to get your panels swinging smoothly again.
Use shims for a perfect fit
If your shutter frame doesn’t sit flush against the wall, it’s likely because your window opening isn’t perfectly square, which is surprisingly common. To fix the resulting gaps, you can use small, thin wedges called shims. Gently slide a shim between the shutter frame and the wall where the gap is largest. You can add more or adjust the position until the frame is plumb and the gap is gone. Once you’re happy with the fit, you can score and snap off the excess shim material so it’s hidden from view. While this is a manageable DIY fix, it highlights why our mobile services focus on precise measurements from the start.
Replace worn-out magnets and catches
The small magnets and metal plates on your shutter frame are what keep the panels securely closed. Constant exposure to sunlight and regular use can sometimes weaken them, causing your shutter panels to swing open on their own. Replacing them is a straightforward task. You can find replacement shutter magnets at most hardware stores. Simply unscrew the old magnet and catch from the shutter panel and frame, and install the new ones in the same spot. Make sure the new magnet and plate align properly so they make solid contact when the panel is closed. This quick fix will restore that satisfying snap-shut closure.
How to Stop Light from Leaking Around Your Shutters
Plantation shutters are fantastic for controlling light, but sometimes a little bit of sun still finds its way around the edges. This is especially common with inside mount shutters, which fit snugly inside the window frame. While a perfect custom fit minimizes this, tiny gaps can still let in unwanted light, especially in older homes where window frames may not be perfectly square. If you’re aiming for a pitch-black room for better sleep or the ultimate movie-watching experience, those little light leaks can be a nuisance. The good news is that you don’t have to live with them. There are several simple and effective ways to block that light and get the total darkness you’re looking for. From quick DIY fixes to more layered solutions, you can easily take your light control to the next level. Here are a few easy fixes you can try to solve the problem for good.
Seal gaps with weatherstripping
One of the easiest DIY solutions for light leakage is applying weatherstripping around your window frame. You can find this adhesive-backed foam or rubber stripping at any hardware store. Simply cut it to size and press it into place along the inside of the window frame where the shutter panels meet it. This creates a soft, tight seal that closes off those small gaps. An inside mount can provide excellent light blockage on its own, but adding weatherstripping takes it to the next level by creating an even more secure barrier against any light trying to sneak in. It’s a quick, inexpensive fix that makes a noticeable difference.
Add light-blocking strips
If you want a solution specifically designed for this problem, look for light-blocking strips. These are often made of a rigid L-shaped material and can be installed on the shutter frame or the window jamb to create an overlapping seal. To minimize light seepage, you can add these strips along the edges of the shutters where the panels meet. This creates a more effective barrier against light leaks than weatherstripping alone might provide. They are designed to blend in with your shutters, so you won’t have to sacrifice style for function. It’s a clean, professional-looking way to achieve a true blackout effect.
Adjust your louver angle
Before you add anything to your windows, try this simple trick. Adjusting the angle of your louvers can help control how much light enters the room. By tilting them in a downward position, you can reduce light seepage significantly. This works because it directs the light away from your line of sight and often blocks the direct path of the sun’s rays. Depending on the time of day and the position of the sun, you might find that tilting them upward works better. Experiment with different angles to see what gives you the best result. It’s a zero-cost solution you can do right now.
Layer with drapes or shades
For maximum light control, layering your shutters with drapes or shades provides an extra barrier against light leakage, enhancing your room’s darkness. This combination is the ultimate solution for light-sensitive sleepers or for creating a theater-like atmosphere in your living room. Pairing elegant shutters with blackout curtains or cellular shades not only blocks nearly all incoming light but also adds depth, texture, and an extra layer of insulation to your windows. It’s a beautiful and practical approach that gives you flexible control over your room’s ambiance.
Related Articles
- Plantation Shutters Installation: A Step-by-Step Guide
- Custom Plantation Shutters: The Ultimate Guide
- Affordable Plantation Shutters: A Buyer’s Guide
Frequently Asked Questions
Is it normal for my shutters to need adjustments over time? Yes, it’s completely normal. Just like any other functional part of your home, shutters can require small tweaks now and then. Everyday use, changes in humidity, and even your house settling can cause things like louvers to loosen or panels to need a slight realignment. Most of these adjustments are very simple and are just a part of routine home maintenance.
My louvers keep drooping down. How can I fix this myself? This is one of the most common shutter issues, and thankfully, it’s also one of the easiest to fix. On the side of your shutter panel, you should see a small hole with a screw inside. This is the tension screw. All you need is a Phillips head screwdriver to give that screw a gentle clockwise turn. A quarter-turn is usually enough to add the right amount of tension to hold the louvers in place.
What’s the best way to stop light from peeking around the edges of my shutters? For a quick fix, you can apply self-adhesive weatherstripping to the inside of your window frame where the shutter closes. This helps create a tighter seal. For a more complete solution, layering your shutters with blackout curtains is a great option. This combination not only blocks nearly all light but also adds a nice, soft texture to your room’s decor.
Why don’t my shutter panels close smoothly anymore? If your shutter panels are sticking or feel stiff, the cause is usually a buildup of dust in the hinges. A quick vacuum with a brush attachment can often solve the problem. If they still feel tight, you can apply a small amount of a silicone-based spray to the hinges. This will lubricate the mechanism without attracting more dust in the future.
How can I prevent these issues before my shutters are even installed? The best way to avoid problems down the road is to ensure a perfect fit from the very beginning. Many issues with alignment, gaps, and operation stem from imperfect measurements or window frames that aren’t perfectly square. A professional consultation and installation is the key, as an expert will account for your window’s unique quirks and any potential obstructions, like cranks or locks, to guarantee a flawless fit.


